 |
Graflex.org Get help with your Graflex questions here This forum is temporarily read-only. |
| problems and dissasembly tips for an early RB Graflex Auto Goto page Previous 1, 2 | |
| Graflex.org Forum Index -> Reflex Help | |
| Author | Message | ||
|---|---|---|---|
| 45PSS Joined: 28 Sep 2001 Posts: 4081 |  Posted: Thu Feb 11, 2021 9:51 pm
| ||
| 45PSS Joined: 28 Sep 2001 Posts: 4081 | Posted: Fri Feb 12, 2021 2:39 am https://www.ebay.es/sch/i.html?_from=R40&_trksid=p2380057.m570.l1313&_nkw=burnsomatic&_sacat=0 The first 2 listings are the type I use without the soldering tip provided the link works correctly for you. $$$$$$$ | ||
| William Hallett Joined: 07 Jan 2012 Posts: 103 | Posted: Fri Feb 12, 2021 5:40 pm Thanks for your information on the solder, 45PSS. I hadn't encountered that particular solder before, but from the manufacturer's web site I see that it combines high strength with a low melting point (222C or 431F - about the same as no-lead plumbing solders). Thanks for the tip! | ||
| Carbo73 Joined: 15 Dec 2019 Posts: 12 | Posted: Sat Feb 13, 2021 6:54 pm Well, after two days of trials, I'm stuck. Even with just trial soldering of a couple of screws, my success rate is 0. And even I take a look at youtube videos about silver soldering. And I'm using flux, too. My silver solder, which looks like a spring inside a plastic tube, like yours, does not melt near the flame, it evaporates, disapears. I can't even put it near the metal to solder. It forms a kind of silvery pellets, which can then put red hot and melt, at least over the ceramic plate I use as a base. I tried to put pieces of solder covered in flux above the parts to solder, and even trying to put the flame not so near. It then appeared to melt into the joint (although the flux burned with flame). After a while I tried to move the screws, and they separated without effort. I don't know what I'm doing wrong. Maybe the type of solder, but it's clearly "silver solder"!! https://www.rangefinderforum.com/rffgallery/showphoto.php?photoid=302402&showall=1 https://www.rangefinderforum.com/rffgallery/showphoto.php?photoid=302401 https://www.rangefinderforum.com/rffgallery/showphoto.php?photoid=302400 https://www.rangefinderforum.com/rffgallery/showphoto.php?photoid=302399 | ||
| 45PSS Joined: 28 Sep 2001 Posts: 4081 | Posted: Sat Feb 13, 2021 7:29 pm You may have the flame too high. If you are trying to solder the nut to the bolt then heat on the left and add the solder on the right. Coat the joint with the flux, heat, add solder next to the fame not directly in it. Some materials need the impurities burned off before the solder will take. Galvanized metal will require the galvanization removed before it will take solder. | ||
| William Hallett Joined: 07 Jan 2012 Posts: 103 | Posted: Wed Feb 17, 2021 2:47 pm The recipe for successful soldering of any kind is clean metal, lots of flux, and apply the heat to the joint, not to the solder itself (in other words, let the hot joint melt the solder). The metal has to be really clean - clean it with emery paper or steel wool. I note that the solder you are using has the flux in the core - it is usually much easier to solder with a separate flux which you can apply to the joint before soldering, because this prevents the joint from oxidizing while you heat it. If you are new to soldering, I would recommend trying your skills on a few pieces of scrap metal of the same kind as the Graflex parts (which are probably brass). | ||
| Carbo73 Joined: 15 Dec 2019 Posts: 12 | Posted: Wed Feb 17, 2021 9:42 pm Well, I'm really new to soldering, so I have a lot of problems; but this afternoon I think that more or less I've soldered the parts, although I'm not sure of the strengh and quality of the solder. I've cleaned the parts more or less (it's a dificult tiny hole), and put a lot of flux cream I bought. Mine silver solder does not contain flux as far as I see. Then I've managed to solder in a complicated way.. As I said, the solder wire evaporates, but leaves silvery pellets, which could be melted by the flame. So I've taken a couple of these and put them above the point to solder, and then I melted them. I know is not as you say, but for now it seems to stand in place. and has been difficult enough to reach that point. We will see. Tomorrow I will try to reassemble the shutter mechanism. | ||
| 45PSS Joined: 28 Sep 2001 Posts: 4081 | Posted: Thu Feb 18, 2021 12:05 am Picture of the joint before you assemble please. | ||
| Carbo73 Joined: 15 Dec 2019 Posts: 12 | Posted: Mon Feb 22, 2021 12:09 am After several trials I think (I hope!) I've managed to make this RB Auto Graflex in full working condition. Still some small issues to polish, kind of collateral damage. It was difficult to do the soldering. I had to remade it three times, as it keeped being fragile. In fact, the first time I managed to do the soldering more or less, the "blob" of solder protruded 1 or 2 mm into the camera, blocking the movement of the parts, and even scratching and breaking a bit of the wood (fortunately with some glue it seems to be strong enough). So I filed this solder... wich broke lose the part, again. Some efforts later finally I managed to do the solder, with the part firmly attached to it's position and pressing the "blub" down with some tools. The result is quite ugly on the inside, but seems to do it's job. 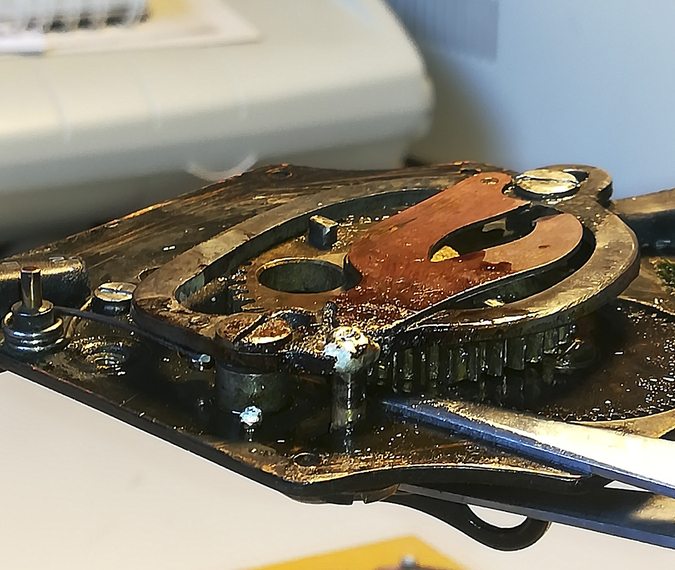 Then I assembled the camera again, also finding a bit difficult to correctly position the curtain. I'm not extra tensioning it, as I don't want to stress the fabric. Also I found that now I can't reach the last, narrowest slit of the curtain, but probably I will leave it as is for now. Probably I positioned the slits a bit too up while trying to sincronize the curtain with the proper exposition positions. I have no intention to shoot this Graflex at top speed, so this is no problem, and maybe is even safer for the curtain not to reach it's top slit, anyway. Thanks to 45PSS and the others for all the tips about soldering and repairs. I used the camera with some film today and it focuses nicely, although with the hurry to get the film developed I don't what I messed but I solarized it a lot. But that has obviously no relation to the camera. | ||
| 45PSS Joined: 28 Sep 2001 Posts: 4081 | Posted: Mon Feb 22, 2021 8:24 pm Two possible conditions that prevent the curtain from winding to the smallest aperture, the initial tension is too high or the curtain is wound too high onto the top roller at O. The top stay (opening stiffener) should be between the top image opening roller and the bottom edge of the top curtain roller with the initial tension set. | ||
| Carbo73 Joined: 15 Dec 2019 Posts: 12 | Posted: Mon Feb 22, 2021 9:00 pm
Thanks, should be the too high position, as the tension is not hight at all. It is surely too low, but I'm afraid to tension too much, as saw a nightmare image of a ripped off curtain in some forum (this one, maybe?). I will re-adjust the position someday, but for now, I think I'm happy with the settings I have (although that could be reconsidered once I check speeds more in detail). | ||
| 45PSS Joined: 28 Sep 2001 Posts: 4081 | Posted: Mon Feb 22, 2021 10:44 pm Ripped curtain comes from dry rotted by poor storage, too much pressure on the wind key when the shutter is stuck. As long as you can work with the exposure times you have all is good. | ||
| All times are GMT | Goto page Previous 1, 2 |
Read-only archive of a phpBB 2 board · Powered by phpBB © 2001, 2005 phpBB Group